Small tools. One-time purchases. Real examples and setup guides. Try the available previews before buying.

Perunlight Corp

Step-by-step guide

Holbein Route

Draw a small counted blackwork motif, generate its double-running route, and print numbered front/back instructions.

You author small original counted blackwork motifs and need a route with explicit thread breaks, face changes and numbered travel instructions.
Get Holbein Route · $7.99

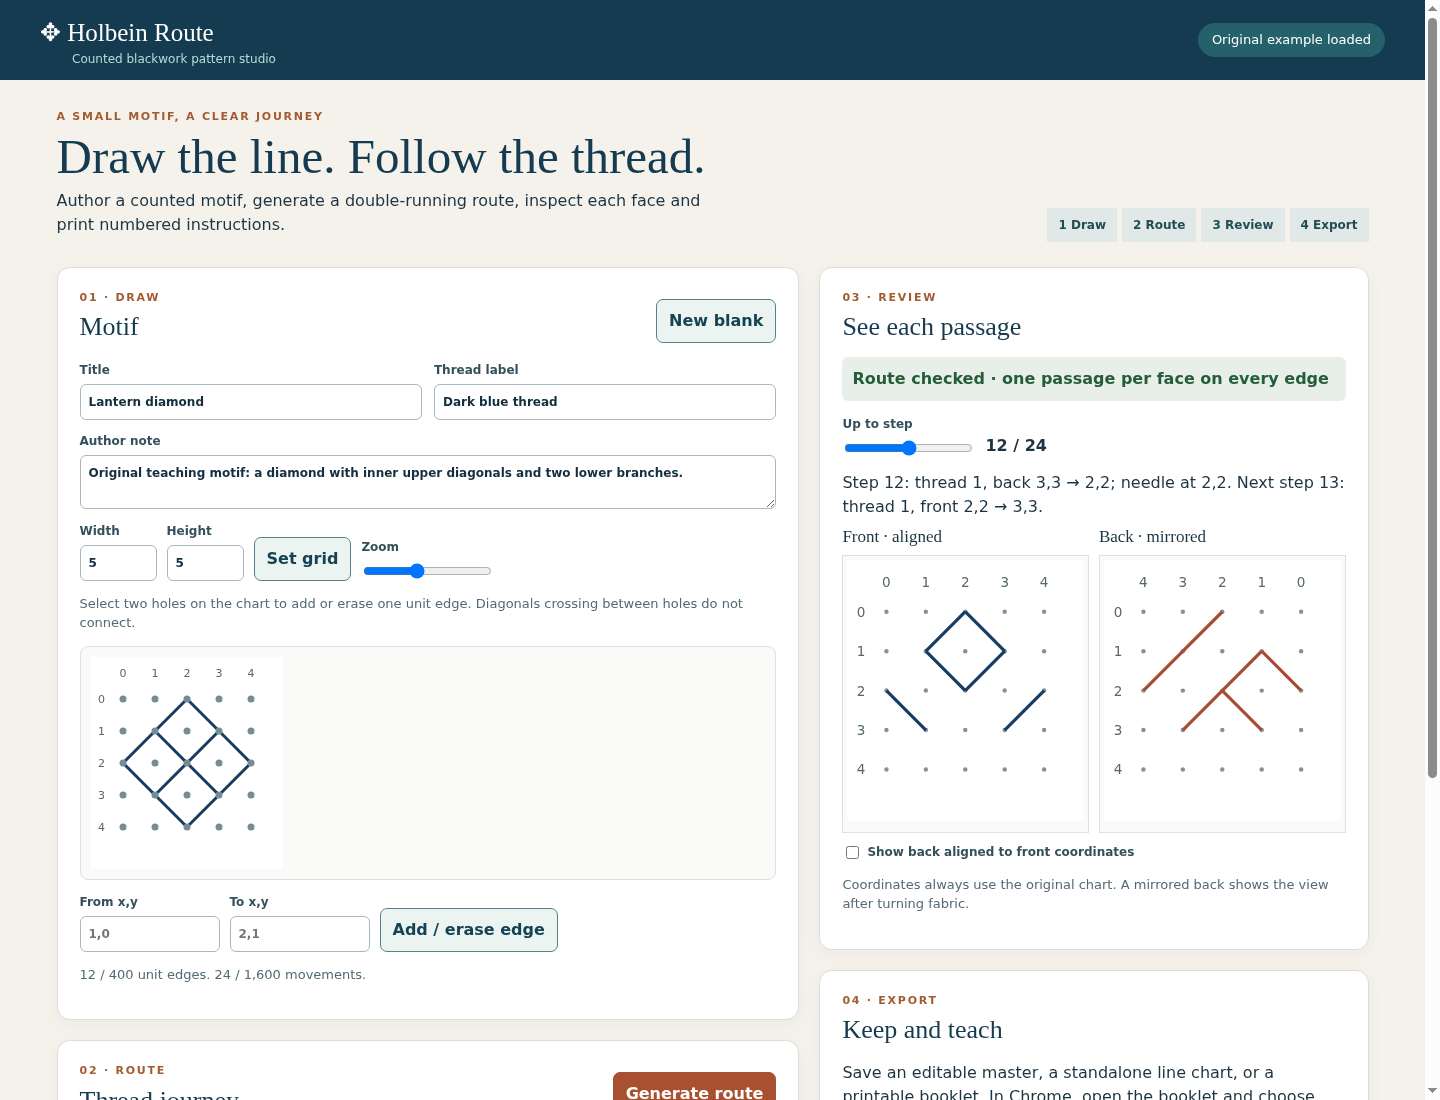
Holbein Route: The original Lantern diamond in the running editor: 12 drawn edges and a checked 24-movement route, with front and mirrored-back views.
The original Lantern diamond in the running editor: 12 drawn edges and a checked 24-movement route, with front and mirrored-back views. View full size

Before you start

  • Extract the whole buyer ZIP and open index.html in desktop Google Chrome. The original Lantern diamond opens immediately. No account, server or network connection is required.
  • Desktop Chrome 152 on Linux is the tested environment. A mouse or keyboard coordinate entry can be used.
  • Use your own original motif and basic knowledge of double-running stitch. Stitch and inspect a real sample before teaching or publishing it.

Your first result

  1. Open the original example

    Extract the complete buyer ZIP and open index.html. The original Lantern diamond starts with 12 edges and a 24-movement route. Open MANUAL.html for the illustrated guide.

  2. Follow the needle

    Move Up to step through the route. Read the thread, face and from/to coordinates. The back diagram is mirrored as seen after turning fabric; Show back aligned to front coordinates changes only its display. Recorded coordinates always use the original front chart.

  3. Make your own motif

    Choose New blank, set the grid size and select two adjacent holes to add or erase an edge. The From x,y and To x,y form provides keyboard entry. Add a title and note, then choose Generate route. A preferred start must be a hole on a drawn edge.

  4. Review and repair

    Open Edit movements to add a connected movement, remove a step or start a new thread. Read each finding after a change. Regenerate to replace the edited route, or repair it manually. The included broken-diamond.json demonstrates a missing return.

  5. Keep the editable project

    Use Download project JSON before closing. Open a project JSON restores the motif, route and notes. A rejected import leaves the current work in place. Undo restores recent editing actions in the current session.

  6. Export the teaching sheet

    Choose Download SVG chart and Download booklet HTML. Open the downloaded booklet alone in Chrome and use Print / Save as PDF at A4 or Letter. Inspect all rows and the final movement. An unresolved route is marked DRAFT · UNRESOLVED. Make and inspect a physical sample before using the result as finished stitching instructions.

A worked example

Free example · Lantern diamond

Follow the thread, one step at a time.

Watch the front and back build up across 24 movements. This fixed original motif is the same example as the free download.

Choose a numbered step

Use a number below. With a keyboard, focus a step and use the arrow keys.

Step 1 of 24 · Thread 1

Front · (2, 0) → (1, 1)

Highlighted line: this movement. Open circle: from. Filled circle: to.

FrontAs seen from the front
1 of 12 front passages shown. Coordinates start at the top left. Current passage: (2, 0) to (1, 1).0123401234

1 of 12 passages

BackMirrored left to right
0 of 12 back passages shown. The back is mirrored left to right, with original coordinate labels. This step is on the front.0123401234

0 of 12 passages

Step 2 of 24 · Thread 1

Back · (1, 1) → (0, 2)

Highlighted line: this movement. Open circle: from. Filled circle: to.

FrontAs seen from the front
1 of 12 front passages shown. Coordinates start at the top left. This step is on the back.0123401234

1 of 12 passages

BackMirrored left to right
1 of 12 back passages shown. The back is mirrored left to right, with original coordinate labels. Current passage: (1, 1) to (0, 2).0123401234

1 of 12 passages

Step 3 of 24 · Thread 1

Front · (0, 2) → (1, 3)

Highlighted line: this movement. Open circle: from. Filled circle: to.

FrontAs seen from the front
2 of 12 front passages shown. Coordinates start at the top left. Current passage: (0, 2) to (1, 3).0123401234

2 of 12 passages

BackMirrored left to right
1 of 12 back passages shown. The back is mirrored left to right, with original coordinate labels. This step is on the front.0123401234

1 of 12 passages

Step 4 of 24 · Thread 1

Back · (1, 3) → (2, 2)

Highlighted line: this movement. Open circle: from. Filled circle: to.

FrontAs seen from the front
2 of 12 front passages shown. Coordinates start at the top left. This step is on the back.0123401234

2 of 12 passages

BackMirrored left to right
2 of 12 back passages shown. The back is mirrored left to right, with original coordinate labels. Current passage: (1, 3) to (2, 2).0123401234

2 of 12 passages

Step 5 of 24 · Thread 1

Front · (2, 2) → (1, 1)

Highlighted line: this movement. Open circle: from. Filled circle: to.

FrontAs seen from the front
3 of 12 front passages shown. Coordinates start at the top left. Current passage: (2, 2) to (1, 1).0123401234

3 of 12 passages

BackMirrored left to right
2 of 12 back passages shown. The back is mirrored left to right, with original coordinate labels. This step is on the front.0123401234

2 of 12 passages

Step 6 of 24 · Thread 1

Back · (1, 1) → (2, 2)

Highlighted line: this movement. Open circle: from. Filled circle: to.

FrontAs seen from the front
3 of 12 front passages shown. Coordinates start at the top left. This step is on the back.0123401234

3 of 12 passages

BackMirrored left to right
3 of 12 back passages shown. The back is mirrored left to right, with original coordinate labels. Current passage: (1, 1) to (2, 2).0123401234

3 of 12 passages

Step 7 of 24 · Thread 1

Front · (2, 2) → (3, 1)

Highlighted line: this movement. Open circle: from. Filled circle: to.

FrontAs seen from the front
4 of 12 front passages shown. Coordinates start at the top left. Current passage: (2, 2) to (3, 1).0123401234

4 of 12 passages

BackMirrored left to right
3 of 12 back passages shown. The back is mirrored left to right, with original coordinate labels. This step is on the front.0123401234

3 of 12 passages

Step 8 of 24 · Thread 1

Back · (3, 1) → (2, 0)

Highlighted line: this movement. Open circle: from. Filled circle: to.

FrontAs seen from the front
4 of 12 front passages shown. Coordinates start at the top left. This step is on the back.0123401234

4 of 12 passages

BackMirrored left to right
4 of 12 back passages shown. The back is mirrored left to right, with original coordinate labels. Current passage: (3, 1) to (2, 0).0123401234

4 of 12 passages

Step 9 of 24 · Thread 1

Front · (2, 0) → (3, 1)

Highlighted line: this movement. Open circle: from. Filled circle: to.

FrontAs seen from the front
5 of 12 front passages shown. Coordinates start at the top left. Current passage: (2, 0) to (3, 1).0123401234

5 of 12 passages

BackMirrored left to right
4 of 12 back passages shown. The back is mirrored left to right, with original coordinate labels. This step is on the front.0123401234

4 of 12 passages

Step 10 of 24 · Thread 1

Back · (3, 1) → (4, 2)

Highlighted line: this movement. Open circle: from. Filled circle: to.

FrontAs seen from the front
5 of 12 front passages shown. Coordinates start at the top left. This step is on the back.0123401234

5 of 12 passages

BackMirrored left to right
5 of 12 back passages shown. The back is mirrored left to right, with original coordinate labels. Current passage: (3, 1) to (4, 2).0123401234

5 of 12 passages

Step 11 of 24 · Thread 1

Front · (4, 2) → (3, 3)

Highlighted line: this movement. Open circle: from. Filled circle: to.

FrontAs seen from the front
6 of 12 front passages shown. Coordinates start at the top left. Current passage: (4, 2) to (3, 3).0123401234

6 of 12 passages

BackMirrored left to right
5 of 12 back passages shown. The back is mirrored left to right, with original coordinate labels. This step is on the front.0123401234

5 of 12 passages

Step 12 of 24 · Thread 1

Back · (3, 3) → (2, 2)

Highlighted line: this movement. Open circle: from. Filled circle: to.

FrontAs seen from the front
6 of 12 front passages shown. Coordinates start at the top left. This step is on the back.0123401234

6 of 12 passages

BackMirrored left to right
6 of 12 back passages shown. The back is mirrored left to right, with original coordinate labels. Current passage: (3, 3) to (2, 2).0123401234

6 of 12 passages

Step 13 of 24 · Thread 1

Front · (2, 2) → (3, 3)

Highlighted line: this movement. Open circle: from. Filled circle: to.

FrontAs seen from the front
7 of 12 front passages shown. Coordinates start at the top left. Current passage: (2, 2) to (3, 3).0123401234

7 of 12 passages

BackMirrored left to right
6 of 12 back passages shown. The back is mirrored left to right, with original coordinate labels. This step is on the front.0123401234

6 of 12 passages

Step 14 of 24 · Thread 1

Back · (3, 3) → (2, 4)

Highlighted line: this movement. Open circle: from. Filled circle: to.

FrontAs seen from the front
7 of 12 front passages shown. Coordinates start at the top left. This step is on the back.0123401234

7 of 12 passages

BackMirrored left to right
7 of 12 back passages shown. The back is mirrored left to right, with original coordinate labels. Current passage: (3, 3) to (2, 4).0123401234

7 of 12 passages

Step 15 of 24 · Thread 1

Front · (2, 4) → (1, 3)

Highlighted line: this movement. Open circle: from. Filled circle: to.

FrontAs seen from the front
8 of 12 front passages shown. Coordinates start at the top left. Current passage: (2, 4) to (1, 3).0123401234

8 of 12 passages

BackMirrored left to right
7 of 12 back passages shown. The back is mirrored left to right, with original coordinate labels. This step is on the front.0123401234

7 of 12 passages

Step 16 of 24 · Thread 1

Back · (1, 3) → (2, 4)

Highlighted line: this movement. Open circle: from. Filled circle: to.

FrontAs seen from the front
8 of 12 front passages shown. Coordinates start at the top left. This step is on the back.0123401234

8 of 12 passages

BackMirrored left to right
8 of 12 back passages shown. The back is mirrored left to right, with original coordinate labels. Current passage: (1, 3) to (2, 4).0123401234

8 of 12 passages

Step 17 of 24 · Thread 1

Front · (2, 4) → (3, 3)

Highlighted line: this movement. Open circle: from. Filled circle: to.

FrontAs seen from the front
9 of 12 front passages shown. Coordinates start at the top left. Current passage: (2, 4) to (3, 3).0123401234

9 of 12 passages

BackMirrored left to right
8 of 12 back passages shown. The back is mirrored left to right, with original coordinate labels. This step is on the front.0123401234

8 of 12 passages

Step 18 of 24 · Thread 1

Back · (3, 3) → (4, 2)

Highlighted line: this movement. Open circle: from. Filled circle: to.

FrontAs seen from the front
9 of 12 front passages shown. Coordinates start at the top left. This step is on the back.0123401234

9 of 12 passages

BackMirrored left to right
9 of 12 back passages shown. The back is mirrored left to right, with original coordinate labels. Current passage: (3, 3) to (4, 2).0123401234

9 of 12 passages

Step 19 of 24 · Thread 1

Front · (4, 2) → (3, 1)

Highlighted line: this movement. Open circle: from. Filled circle: to.

FrontAs seen from the front
10 of 12 front passages shown. Coordinates start at the top left. Current passage: (4, 2) to (3, 1).0123401234

10 of 12 passages

BackMirrored left to right
9 of 12 back passages shown. The back is mirrored left to right, with original coordinate labels. This step is on the front.0123401234

9 of 12 passages

Step 20 of 24 · Thread 1

Back · (3, 1) → (2, 2)

Highlighted line: this movement. Open circle: from. Filled circle: to.

FrontAs seen from the front
10 of 12 front passages shown. Coordinates start at the top left. This step is on the back.0123401234

10 of 12 passages

BackMirrored left to right
10 of 12 back passages shown. The back is mirrored left to right, with original coordinate labels. Current passage: (3, 1) to (2, 2).0123401234

10 of 12 passages

Step 21 of 24 · Thread 1

Front · (2, 2) → (1, 3)

Highlighted line: this movement. Open circle: from. Filled circle: to.

FrontAs seen from the front
11 of 12 front passages shown. Coordinates start at the top left. Current passage: (2, 2) to (1, 3).0123401234

11 of 12 passages

BackMirrored left to right
10 of 12 back passages shown. The back is mirrored left to right, with original coordinate labels. This step is on the front.0123401234

10 of 12 passages

Step 22 of 24 · Thread 1

Back · (1, 3) → (0, 2)

Highlighted line: this movement. Open circle: from. Filled circle: to.

FrontAs seen from the front
11 of 12 front passages shown. Coordinates start at the top left. This step is on the back.0123401234

11 of 12 passages

BackMirrored left to right
11 of 12 back passages shown. The back is mirrored left to right, with original coordinate labels. Current passage: (1, 3) to (0, 2).0123401234

11 of 12 passages

Step 23 of 24 · Thread 1

Front · (0, 2) → (1, 1)

Highlighted line: this movement. Open circle: from. Filled circle: to.

FrontAs seen from the front
12 of 12 front passages shown. Coordinates start at the top left. Current passage: (0, 2) to (1, 1).0123401234

12 of 12 passages

BackMirrored left to right
11 of 12 back passages shown. The back is mirrored left to right, with original coordinate labels. This step is on the front.0123401234

11 of 12 passages

Step 24 of 24 · Thread 1

Back · (1, 1) → (2, 0)

Highlighted line: this movement. Open circle: from. Filled circle: to.

FrontAs seen from the front
12 of 12 front passages shown. Coordinates start at the top left. This step is on the back.0123401234

12 of 12 passages

BackMirrored left to right
12 of 12 back passages shown. The back is mirrored left to right, with original coordinate labels. Current passage: (1, 1) to (2, 0).0123401234

12 of 12 passages

All 24 movements shown: 12 passages on each face. Each drawn segment appears once on each face.

Coordinates are x, y on a 5 × 5 grid, starting at zero. The back view is mirrored left to right; its labels still identify the same holes. Grey dashed lines show the complete motif. This is a structural route example. It has not been physically stitched and does not teach tension, knots, starting or finishing.

Read all 24 movements as a table
Lantern diamond · Thread 1
StepFaceFrom x, yTo x, y
1Front2, 01, 1
2Back1, 10, 2
3Front0, 21, 3
4Back1, 32, 2
5Front2, 21, 1
6Back1, 12, 2
7Front2, 23, 1
8Back3, 12, 0
9Front2, 03, 1
10Back3, 14, 2
11Front4, 23, 3
12Back3, 32, 2
13Front2, 23, 3
14Back3, 32, 4
15Front2, 41, 3
16Back1, 32, 4
17Front2, 43, 3
18Back3, 34, 2
19Front4, 23, 1
20Back3, 12, 2
21Front2, 21, 3
22Back1, 30, 2
23Front0, 21, 1
24Back1, 12, 0

Download the free chart and instructions
To draw and revise your own small motif, see the Holbein Route editor · $7.99 once.

Lantern diamond — original route exercise

Input: A 5 × 5 hole grid with 12 unique unit edges. This is an original authoring example, not a physically verified pattern.

  1. Inspect the example and its one thread.
  2. Move Up to step to 1, then through to 24.
  3. Export the booklet and compare the full numbered front/back table with the chart.

Expected result: 24 movements in one thread: each of the 12 edges once on the front and once on the back. Step 1 travels from 2,0 to 1,1 on the front; step 24 returns from 1,1 to 2,0 on the back. The thread ends at its starting hole.

See the working editor

Actual Chrome views of the original teaching example. Structural checks do not replace a physical stitched sample.

1. Inspect each side of the route

Holbein Route: The original Lantern diamond in the running editor: 12 drawn edges and a checked 24-movement route, with front and mirrored-back views.
The original Lantern diamond in the running editor: 12 drawn edges and a checked 24-movement route, with front and mirrored-back views.

2. Follow the stacked workflow

Holbein Route: The actual 390 px Chrome layout stacks the drawing, route and review panels. Desktop authoring is recommended.
The actual 390 px Chrome layout stacks the drawing, route and review panels. Desktop authoring is recommended.

Troubleshooting

The route is a draft

Read the named edge or movement finding. A changed motif can leave missing or extra face passages; edit the route or generate it again.

A line cannot be drawn

Choose adjacent holes inside the grid. A longer line needs several unit segments. Crossed diagonals only connect when they share an endpoint.

An import is rejected

Use an unchanged Holbein Route schema-1 JSON file within 1 MiB and the stated grid, text and route limits. Other pattern formats are not supported.

Work disappeared after closing

Reopen the last downloaded project JSON. The editor does not automatically save your work.

Printed instructions look clipped

Use Chrome at the default scale with A4 or Letter, then inspect the complete print preview. Keep all pages and review the final step.

Compatibility & limits

  • Checked in desktop Google Chrome 152 on Linux. The narrow view was inspected for small motifs; large 40-hole grids require horizontal scrolling at 390 px. Use a desktop screen for authoring. Mobile browsers and other operating systems are unverified.
  • Draw unit horizontal, vertical or 45-degree diagonal segments on a grid of 2–40 holes per axis. Up to 400 unique edges, 400 threads and 1,600 authored movements. Automatic routes use two movements per edge.
  • Only Holbein Route schema-1 JSON projects, up to 1 MiB. No photo, SVG or third-party pattern import. Title, note and thread label limits are 100, 500 and 80 characters.
  • Front and back alternate within each thread. Disconnected groups start separate threads. Crossing diagonals do not connect between holes. Generation is deterministic and is not route optimization.
  • Route checked means the encoded unit edges have one passage on each face without structural findings. It does not certify real fabric, tension, crossings, carries, knots or starting and finishing. The example has not been physically stitched.
  • Download JSON to preserve your editable work before closing the tab. Editing remains in browser memory; no cloud account or automatic storage is included.
  • Export a standalone SVG chart and printable HTML instructions. Use Chrome Print / Save as PDF for A4 or Letter, and inspect every page. An unresolved route remains prominently marked as a draft.

Need a hand?

Tell us the product, host application and version, what you tried, and the exact error. Contact support with a fictional example; keep private customer files and passwords out of your message.
