Task walkthrough · SvarogImpose
Put a business-card PDF on A4 with bleed and matching backs
You have one finished card design and need a sheet of copies. This worked example makes the dimensions, cut positions and front/back mapping explicit, so you can inspect the PDF before using paper.
A Perunlight workflow for SvarogImpose, our paid offline PDF layout app. Written with AI assistance and checked against the fictional example and independently reviewed SvarogImpose 1.0.0 release. App screenshots show Chrome 152 on Linux. Physical printing and cutting have not been verified. Published .
Start with the finished PDF and its job notes
- Extract the free archive and open examples/hollowfen-card-front-back.pdf. It contains one front and one back for an 85 × 55 mm card, with 3 mm of bleed and an additional purple slug outside the bleed.
- Open examples/expected-imposed-A4.pdf. Expect two A4 pages: eight fronts on page 1 and eight matching backs on page 2. The source design is repeated at its original size; the purple slug is absent.
- Read examples/expected-job-sheet-A4.txt. It records the source hash, layout settings, piece positions and cut coordinates. Compare these with the PDF, not with an image scaled to fit your screen.
Expected layout: 2 columns × 4 rows = 8 cards on a 210 × 297 mm A4 sheet. The first finished card starts 17 mm from the left and 29.5 mm from the top.
The free pack also includes expected-front-sheet.png and expected-back-sheet.png for a quick visual comparison, plus expected-duplex-test-A4.pdf for a physical orientation check. Use the PDFs, rather than the PNG previews, for printing and dimensional inspection.
Keep the finished size separate from the bleed
The finished card is 85 × 55 mm. Adding 3 mm on every side makes its bleed rectangle 91 × 61 mm. That extra artwork allows a cut to land slightly beyond the intended edge without immediately exposing unprinted paper; it does not make the finished card larger.
A PDF can describe these regions separately. The TrimBox identifies the finished dimensions; the BleedBox extends beyond them. Adobe explains both in its page-box documentation. A box alone does not create artwork: your exported design must already contain the required bleed.
In this example, a 0 mm gutter means that adjacent bleed rectangles touch. Their finished trim edges remain 6 mm apart: 3 mm of bleed from each card. This is why the first pair of vertical cut lines is at 17 and 102 mm, while the second card starts at 108 mm.
Card trim:              85 × 55 mm
Bleed:                  3 mm on every side
Bleed rectangle:        91 × 61 mm
Gutter between bleed:   0 mm
Gap between trim edges: 6 mm
A4 sheet:               210 × 297 mm
These settings describe this supplied fixture. Use the bleed, margins and sheet requirements agreed with your print provider for a real job.
Recreate the eight-up layout in SvarogImpose
- Extract the paid ZIP and open SvarogImpose.html in Google Chrome on Linux. Choose Load the example card.
- Check A4 portrait, 5 mm margins and no gripper allowance. Use 3 mm bleed, 0 mm horizontal and vertical gutters, and automatic fit. Keep Rotate design 90° off for this comparison.
- Use crop marks with a 2 mm offset and 5 mm length. Expect 8 per sheet, with a rotated alternative of 9.
- Choose Download imposed PDF. Open the result in your usual PDF viewer and compare both pages with the supplied expected-imposed-A4.pdf.
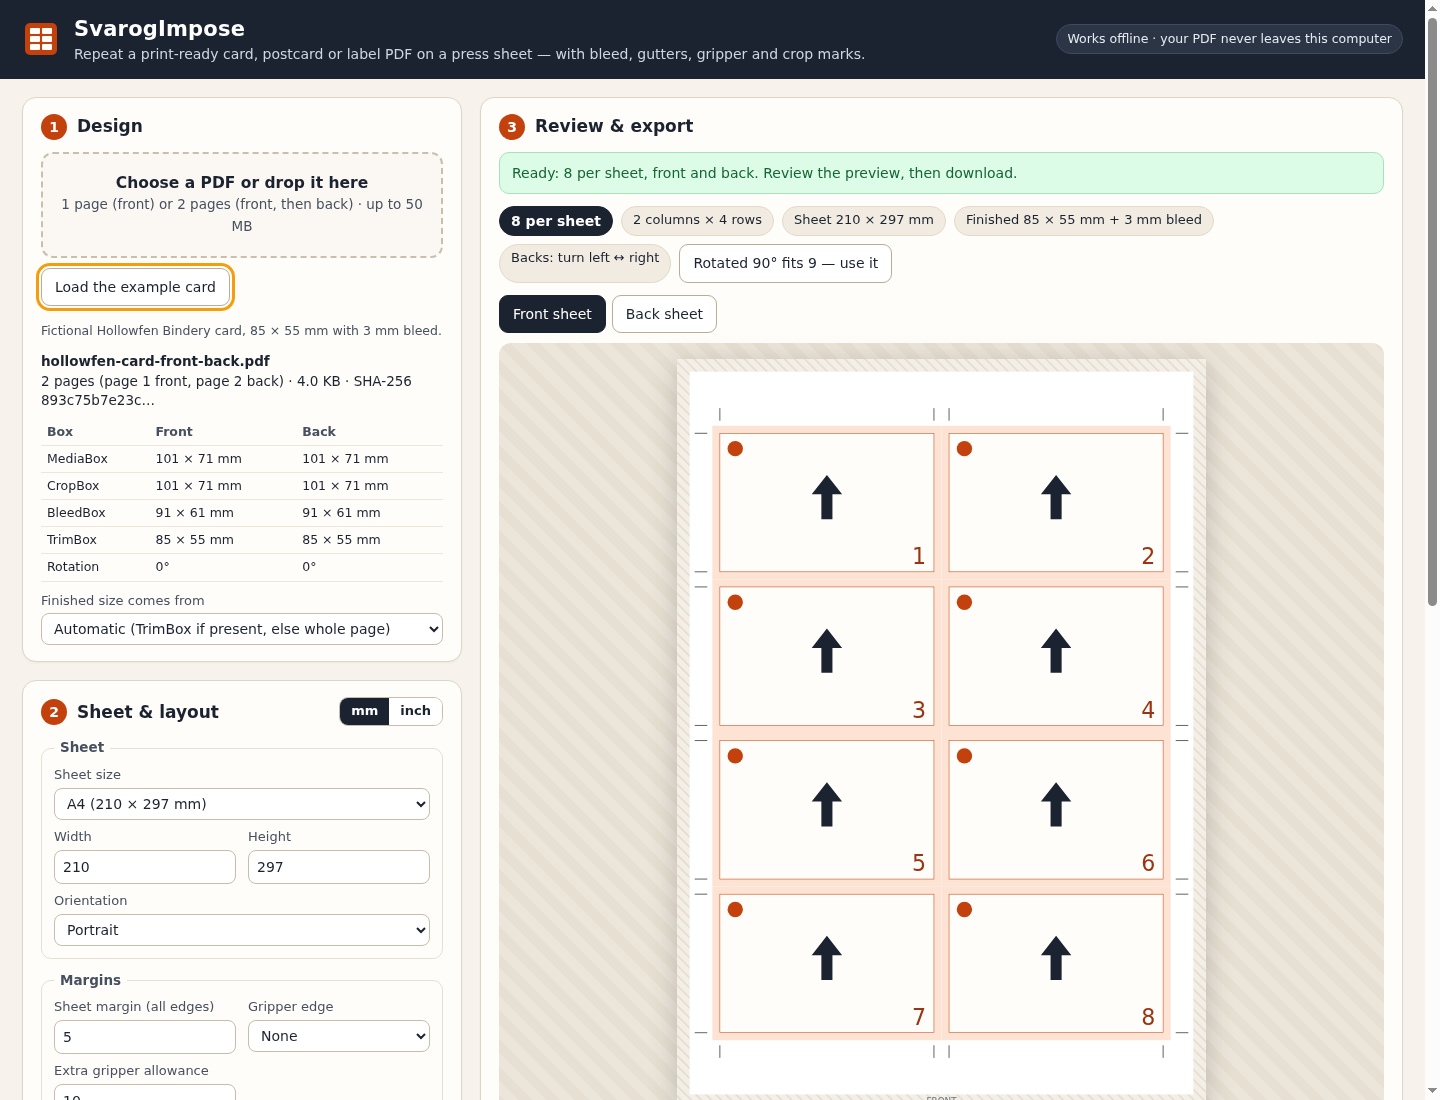
Changing orientation can change the number of copies. The rotated alternative is a layout calculation, not an instruction to change an approved print job. Review the new cut positions and front/back mapping whenever you change it.
Check the backs on the target printer
The example uses left–right turn-over around the vertical sheet edges, with head-to-head backs and zero back offset. Its back PDF places a yellow corner behind each front’s green corner. Screen alignment does not prove how a particular printer feeds or turns the paper.
- Open the supplied duplex test PDF, or download a fresh one from the app after changing settings. Review the front and back labels.
- Print one proof at actual size on the intended printer and paper, using its normal duplex workflow. If a printer cannot accommodate the selected sheet or marks, change the job settings and regenerate the PDF.
- Inspect which back belongs to each front, whether the text faces the intended way, and whether the registration marks align. Measure the printed card dimensions.
- If needed, change turn-over or head-to-foot and enter a measured back offset in the app. Export again and print another proof before producing a batch.
In Acrobat, Actual size avoids scaling, while Fit changes the page to fit the printable area. Content outside the printable area can still be clipped at actual size. Check the official print-sizing options and your printer settings.
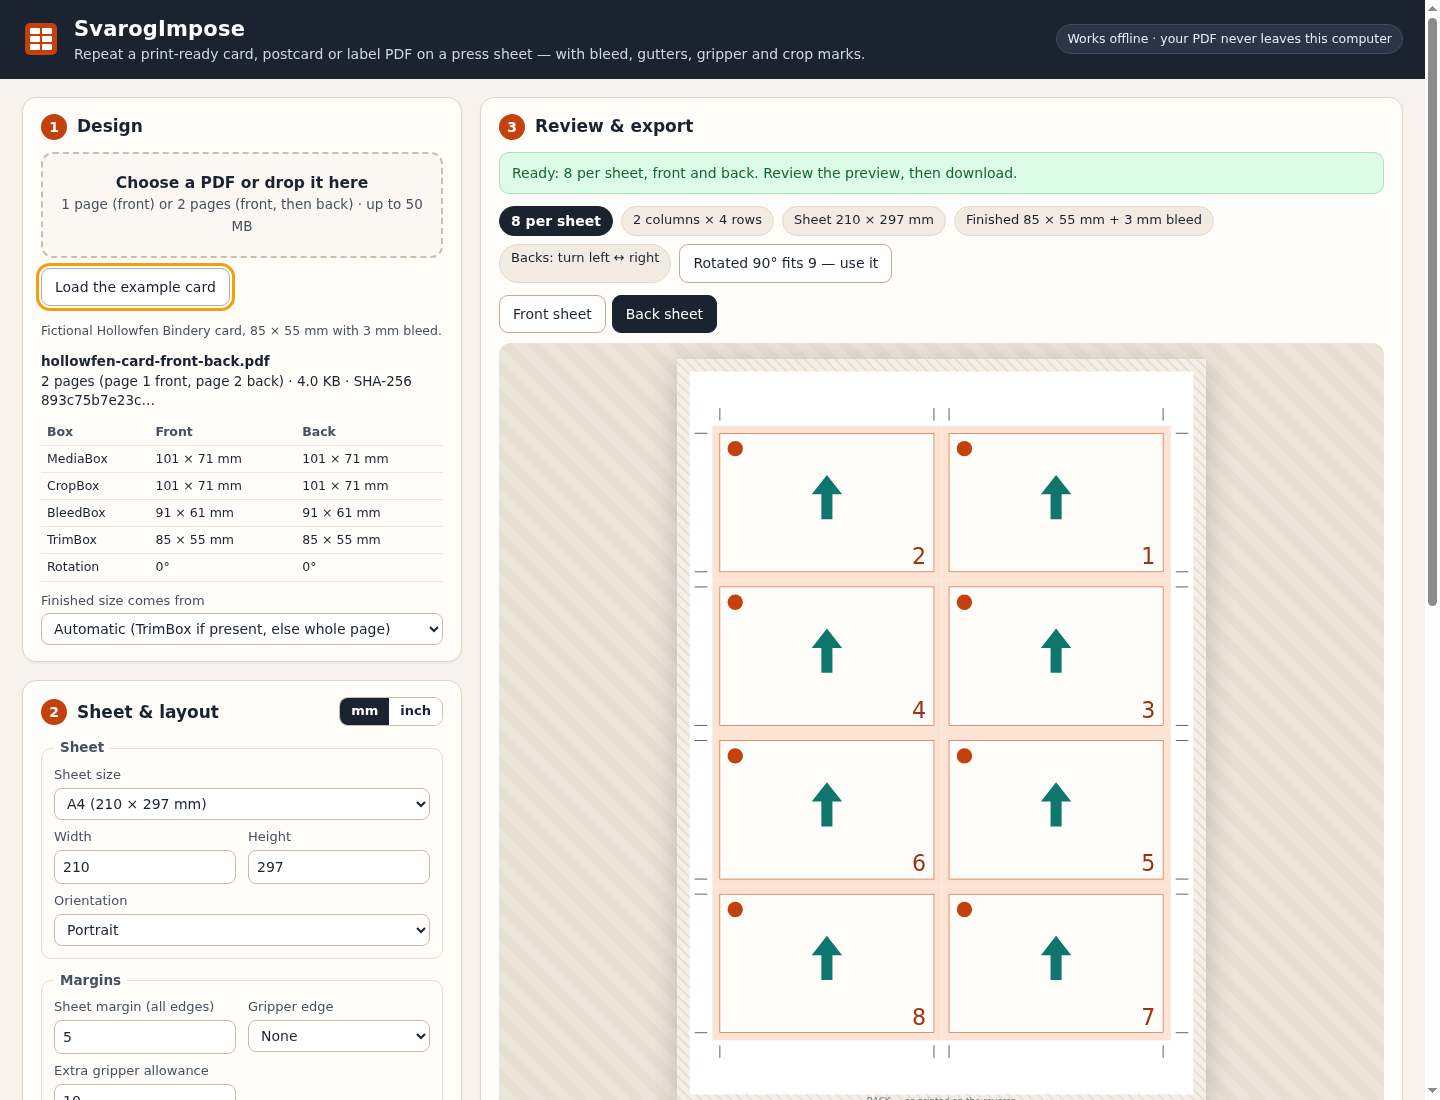
Before a production run: confirm the finished size, front/back pairing, orientation, registration and cut plan on your own proof. This example has been verified digitally; physical output remains unverified.
Keep the cut plan with the exported PDF
For the unchanged example, the vertical cut coordinates measured from the left edge are 17, 102, 108 and 193 mm. The horizontal coordinates measured from the top are listed below. They describe PDF geometry and require checking against your printed proof.
Vertical cuts from left (mm):
17, 102, 108, 193

Horizontal cuts from top (mm):
29.5, 84.5, 90.5, 145.5, 151.5, 206.5, 212.5, 267.5- Keep the source PDF, exported sheet PDF and the job sheet together.
- Save the settings JSON if the job will be repeated.
- Record the printer and paper setup used for the approved proof.
- Generate new job notes after changing the artwork, sheet, bleed, marks, orientation or offsets.
A source hash helps identify the file used for a layout. It does not certify the design, colour or physical result. The app reads the source PDF and exports a new file.
Check the workflow before buying
SvarogImpose 1.0.0 repeats one finished design per job: one page for fronts, or two pages with matching finished sizes for fronts and backs. It accepts supported unencrypted PDFs up to 50 MB and never scales the design. The verified host is Google Chrome 152 on Linux; other browsers and operating systems remain unverified.
It does not mix different designs, build booklets or perform preflight or PDF/X certification. Colour, spot inks, overprint, ICC preservation, printer registration and cutting require separate verification. The placement diagram is not an artwork preview.
Annotations, links, layer visibility, page transparency groups and output intent are not carried over. Signed, form-field, active-content and unsupported PDFs are refused. Read the complete input and output limits before using a production file.
Perunlight product
Make a new sheet with SvarogImpose
$29 USD, one-time purchase. Repeat a supported card or label PDF, set bleed and cut marks, map matching backs, and export the sheet, test PDF and job notes.
Get SvarogImpose · $29Read the complete setup guide
No purchase is needed to inspect the supplied PDFs and manual. The app for making your own layouts is included in the paid download.